Understanding gRPC
gRPC and its purpose
gRPC is a modern Remote Procedure Call (RPC) framework. But what does that mean?
Think of it like this: imagine you have two computers, and you want them to communicate with each other. You could do that by sending messages back and forth, but that can be tedious and inefficient. RPC makes it easier by letting one computer call a function on the other computer as if it were a local function.
Now, gRPC takes it a step further by using the HTTP/2 protocol to make these calls. This has a bunch of benefits, like making it more efficient and secure. Plus, gRPC is designed to work across different programming languages, so you can use it no matter what language you prefer.
So, what's the purpose of gRPC? It makes it easier to build distributed systems by simplifying the communication between different parts of the system. This can save you time and effort, and make your system more reliable.
Difference between gRPC and REST API
gRPC and REST API are both ways to enable communication between different systems. But they differ in how they achieve this communication.
REST API stands for Representational State Transfer Application Programming Interface. It uses HTTP protocol and relies on standard HTTP verbs like GET, POST, PUT, DELETE, etc., to transfer data between different systems. REST is designed to be stateless and resource-oriented, meaning it treats every request as a unique transaction, and each resource has its own unique identifier (URI).
On the other hand, gRPC stands for Google Remote Procedure Call. It uses HTTP/2 protocol to enable communication between different systems. gRPC focuses on calling methods on a remote server, making it more function-oriented, where functions are defined in "services" and "messages."
So, which one should you use? It depends on what you need.
If you need to transfer large amounts of data, gRPC is generally more efficient since it uses binary data rather than the text-based approach of REST API. Additionally, if you're working with distributed systems that require high performance, low latency, and real-time capabilities, gRPC is a better option.
On the other hand, if you need simplicity, flexibility, and compatibility with existing systems, REST API is a better choice. REST API is also more widely adopted and easier to understand for developers who are new to API development.
In summary, both gRPC and REST API have their strengths and weaknesses. Choosing between them depends on the specific needs of your application.
gRPC architecture
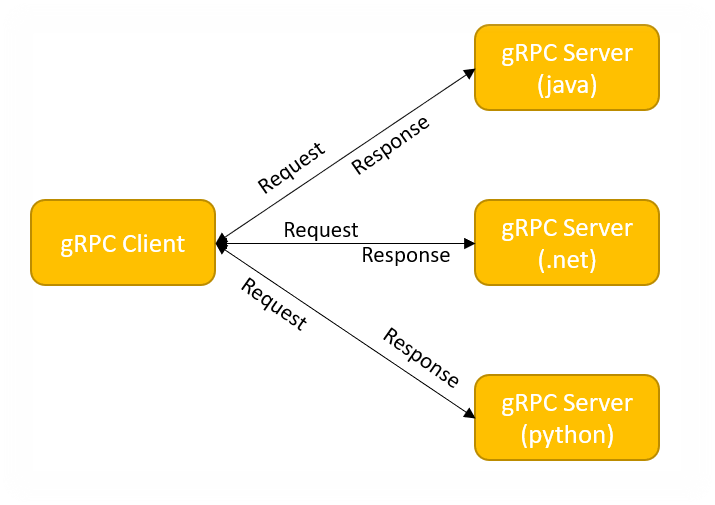
At a high level, gRPC architecture consists of two main components: the server and the client. The server provides a set of procedures that the client can call remotely. The client then makes requests to the server and waits for a response.
The gRPC architecture is based on Protocol Buffers, a language-agnostic, platform-neutral mechanism for serializing structured data. Protocol Buffers use a simple language to define the structure of the data being transmitted.
In gRPC, these structures are defined in .proto files. These files define the messages and services provided by the server. Messages represent the data being transmitted, while services represent the procedures available on the server.
gRPC uses HTTP/2 as the underlying transport protocol, which allows for bidirectional, streaming communication between the client and the server. This enables high-performance communication and efficient use of resources.
One key feature of gRPC architecture is that it supports multiple programming languages. This means that clients and servers can be implemented in different languages and still communicate with each other seamlessly.
Understanding Protocol Buffers (Protobuf)
Overview and benefits
Protocol Buffers, or Protobuf for short, is a language-agnostic mechanism for serializing structured data. It was developed by Google and is used extensively within the company, as well as by other organizations.
So, what are the benefits of using Protobuf? Here are some of the main advantages:
- Efficient: Protobuf is designed to be highly efficient, both in terms of space and processing time. Compared to other serialization formats like JSON or XML, Protobuf can produce smaller messages and can be up to 10 times faster.
- Language-agnostic: As I mentioned earlier, Protobuf is language-agnostic, which means it can be used with a variety of programming languages, including Java, C++, Python, and more.
- Versioning support: Protobuf has built-in support for versioning, which makes it easier to update your data structures without breaking backwards compatibility. This is particularly useful in distributed systems where different components may be running different versions of the software.
- Schema validation: Protobuf uses a schema to define the structure of the data being transmitted, which allows for automatic validation of data before it's processed. This can help catch errors early and prevent bugs.
To use Protobuf in Java, you'll need to define your message types in a .proto file and then use the Protobuf compiler to generate Java code that you can use in your application. Once you have the generated code, you can use it to serialize and deserialize your data.
Defining messages and services
In gRPC, messages and services are defined in .proto files using Protocol Buffers, which is a language-agnostic mechanism for serializing structured data. Let's take a closer look at each of these concepts.
Messages: Messages represent the data being transmitted between the client and the server. They are defined using a simple syntax in the .proto file. For example, here's how you might define a message for a user:
message User {
  string name = 1;
  int32 age = 2;
  repeated string hobbies = 3;
}
This message defines a user object with a name, age, and a list of hobbies. The number next to each field represents its tag, which is used to identify the field in the serialized data.
Once you have defined your message, you can use the Protobuf compiler to generate Java code that you can use to create, serialize, and deserialize instances of the message.
Services: Services represent the procedures that the server provides to the client. They are also defined using a simple syntax in the .proto file. For example, here's how you might define a service for a user service:
service UserService {
  rpc GetUser(GetUserRequest) returns (User);
  rpc CreateUser(CreateUserRequest) returns (CreateUserResponse);
  rpc UpdateUser(UpdateUserRequest) returns (UpdateUserResponse);
  rpc DeleteUser(DeleteUserRequest) returns (DeleteUserResponse);
}
This service defines four procedures that the client can call: GetUser, CreateUser, UpdateUser, and DeleteUser. Each procedure takes a request message as an argument and returns a response message.
Once you have defined your service, you can use the Protobuf compiler to generate Java code that you can use to implement the service on the server and call it from the client.
Setting up a gRPC environment
Installing necessary tools
Before we start, make sure you have the following tools installed on your system:
a. Java Development Kit (JDK): You'll need Java 8 or higher.
b. Apache Maven: This is our build tool of choice. Get it from the official website and follow the installation instructions.
c. IntelliJ IDEA (optional): This is a popular Java IDE that'll make your life easier. You can download the Community Edition for free from the official website.
d. Protobuf Compiler (protoc): We'll use this to generate Java code from our protobuf files. Download the appropriate version for your system from the official releases page.
Basic gRPC Project
Let's take a look at how to set up a simple gRPC project with Java and Maven.
Define your Protocol Buffer (.proto file):
First, create a .proto file to define your service and messages. This file serves as the interface between client and server. Let's call it HelloWorld.proto:
syntax = "proto3";

option java_multiple_files = true;
option java_package = "com.example.grpc.helloworld";
option java_outer_classname = "HelloWorldProto";

package myservice;

service HelloWorld {
  rpc SayHello (HelloRequest) returns (HelloResponse);
}

message HelloRequest {
  string name = 1;
}

message HelloResponse {
  string message = 1;
}
Put the proto files in the src/main/proto and src/test/proto directories.
Add the gRPC dependencies in the pom.xml:
<dependencies>
  <dependency>
    <groupId>io.grpc</groupId>
    <artifactId>grpc-netty-shaded</artifactId>
    <version>1.54.1</version>
    <scope>runtime</scope>
  </dependency>
  <dependency>
    <groupId>io.grpc</groupId>
    <artifactId>grpc-protobuf</artifactId>
    <version>1.54.1</version>
  </dependency>
  <dependency>
    <groupId>io.grpc</groupId>
    <artifactId>grpc-stub</artifactId>
    <version>1.54.1</version>
  </dependency>
  <dependency> <!-- necessary for Java 9+ -->
    <groupId>org.apache.tomcat</groupId>
    <artifactId>annotations-api</artifactId>
    <version>6.0.53</version>
    <scope>provided</scope>
  </dependency>

</dependencies>
For protobuf-based codegen integrated with the Maven build system, you can use protobuf-maven-plugin. Add it to the pom.xml file:
<build>
<extensions>
  <extension>
    <groupId>kr.motd.maven</groupId>
    <artifactId>os-maven-plugin</artifactId>
    <version>1.7.1</version>
  </extension>
</extensions>
<plugins>
  <plugin>
    <groupId>org.xolstice.maven.plugins</groupId>
    <artifactId>protobuf-maven-plugin</artifactId>
    <version>0.6.1</version>
    <configuration>
      <protocArtifact>com.google.protobuf:protoc:3.21.7:exe:${os.detected.classifier}</protocArtifact>
      <pluginId>grpc-java</pluginId>
      <pluginArtifact>io.grpc:protoc-gen-grpc-java:1.54.1:exe:${os.detected.classifier}</pluginArtifact>
    </configuration>
    <executions>
      <execution>
        <goals>
          <goal>compile</goal>
          <goal>compile-custom</goal>
        </goals>
      </execution>
    </executions>
  </plugin>
</plugins>
</build>- Run
mvn compile
That's it, now you have a basic project created.